Thursday, December 8, 2011

The Unknown Becomes Known!

We finally figured out what L-25 is! Based on all our research data (as you have seen in the previous blog entries) we have discovered that L-25 is from the genus known as Serratia. Although we do not have the specific species we hypothesize that the species is S. Marcescens. Today, we also checked the results of our beef purity tests. There was a white percipitate between the anti-bovine and the meat but not between the anti-horse or anti-swine. This means the meat was a pure sample & there was only bovine meat in the ground beef!!
Today we also finished our research projects. We our preforming ours on essential oils and Sreptococcus pneumoniae, however all other information is classified. Hope you enjoyed experiencing this journey through medical microbiology with me. Feel free to grow your own probiotic yogurt at home & look at my other classmate's blogs online. Hope you learned something new!


One Last Look At Serratia


Research On Sreptococcus pneumoniae

So Long,
Annie B

Tuesday, November 22, 2011

Unfrozen Bacteria & Antigens

To start the lab period off, we took out our streak plates made from our frozen samples out of the incubator. Our bacteria (from my throat!) did grow again after it was frozen. This proves that the freezer did preserve the bacteria and not destroy it. The frozen sample is remaining in the freezer in the back, and will preserve for a very long time (my grandchildren could even see it!)


Environmental Bacteria Growth (right half of plate)

Inoculating A Slant


In the next part of lab we performed the ELISA test. This tests for the presence of HIV by using how antigens and antibodies react to one another. In the experiment, the class used the HIV antigen. We added 15 μL (micro liters) of this antigen to each little cup in the tube. We let it sit for 5 minutes, dumped the solution down the sink and than dried out the cups with paper towels. Taking a new pipette cap, we washed the cups with wash buffer. [This procedure occurred twice]. The class then added antibody serums from humans. The first 3 cups received 50 μL of positive (to act as a control), the next 3 cups received 50 μL of negative (again as a control group), and the last four cups were each assigned an unknown. The cups were then dumped & rewashed with the wash buffer and dried. Than 50 μL of the secondary antibody was added to each serum; dumped & rewashed with buffer solution & dried. The class than added 50 μL of sheep enzyme (with a blue indicator) that bonded to the human antibodies. Since the indicator was blue, the serum turned a blue color when the sheep enzymes bonded to the human antibodies (a blue color indicating positive for HIV).

The 3 blue cups on the right indicate HIV

 Since in our test only the positive control turned blue this is a direct indication that none of our unknowns had HIV!
Beef Purity Test
The last part of lab, the class got to check how pure a sample of ground beef was. Taking an agar plate, we suctioned out wells and filled them with different solutions and judged their reactions. We took a sample of raw hamburger meat that was provided for us and tested it with Bovine Albumin, Goat Anti-horse Albumin, Goat Anti-bovine Albumin, & Goat Anti-swine Albumin. If the samples do in fact react to each other than a white solid line will appear. Since the samples must sit for at least 48 hours, join us next lab to see the results!
Annie B


Thursday, November 17, 2011

Lab-Grown Yogurt & Frozen Bacteria

Today in lab, we took out our three milk slash yogurt cups! The control milk spoiled and had a rotten smell. The cups with the pro-biotic tablet & the Kefir did produce yogurts! Yogurt is produced when the bacteria ferments the milk. We tasted them both and the Kefir yogurt was much smoother however both needed some sort of fruit, granola or honey because they were very bland. 
(Left to Right) Pro-Biotic Cup & Kefir Cup

We also took a little adventure to the greenhouse because our professor is always encouraging us to be curious and to ask questions. I loved the greenhouse and am on the hunt for the perfect plant for my dorm.

Our Class in the Greenhouse

A Beautiful Flower

After a trip to the greenhouse, we took our frozen environmental samples (from a few labs ago) out of the freezer (kept at -80 degrees) and created a streak plate out of them. We then placed it in the incubator so see if the bacteria was perserved correctly and as a result would grow.
We also checked on our UV streak plate. Bacteria 'L' did grow. Our professor informed us that it was an error of our own that the UV light did not kill the bacteria. It is due to inadequate exposure to the UV light and we should have left the sample under the light for at least 60 seconds. We also checked the streak plate from the water purifier and determined that the purifier did kill all the bacteria!!! Such a wonderful invention!
Until next lab!
Annie B

Tuesday, November 15, 2011

UV Lights & Yogurt

In lab today we used UV light as a means to kill bacteria and we also cultivated our own pro-biotic yogurt!
To start things off we made a streak of bacteria 'L' and placed it under a UV light. We covered have of the plate as a control to observe if the bacteria was killed or not. We also removed the glass lid so that the UV rays did not refract off the glass. The UV light was left on the bacteria for 30 seconds. After decent exposure, we placed the sample in the incubator. If after 48 hours the bacteria does not grow on the half of the plate that was exposed than we know the UV method worked on bacteria 'L'!

Semi-covered bacteria streaks being exposed to UV light
We also used a Light Purifier in water to kill bacteria and obtain drinkable water. Our professor speaks highly of this purifier because it uses UV light to kill the bacteria in a glass of water. Dr. P uses this often when he is traveling in India and says that since using it he has not gotten sick nor experience traveler's diarrhea. To test this purifier we used the aseptic technique to transfer to of the student's bacterias into the water. While the UV light in the purifier was on, we mixed the water in order to increase maximal contact between the light and bacteria. Once finished we then sterilized the purifier with rubbing alcohol & the flame from a Bunsen burner. We than created a streak plate, incubated it and will return next lab to determine if the purifier worked.

UV light in the Purifier as it elimates bacteria in the water

Making Pro-biotic Yogurt!
We first took Full Fat Vitamin D Milk and heated it up in the microwave until it boiled. Once it came out, we waited until it cooled to 37 degrees Celsius. (Dr. P sped up the process by using cool barrister skills to pour the milk into cups and back into the bowl). We then separated the milk into three cups. The first cup became the control and was only Vitamin D milk. The second milk cup was mixed with a crushed pro-biotic tablet and the third was mixed with Kefir (a pro-biotic drink). The samples were than placed in the incubator and we will check next lab for growth of healthy pro-biotics in the milk. This growth will also lead to the formation of yogurt from the milk!

Vitamin D milk being poured into a bowl to microwave

Crushed Pro-biotic Tablet
Until then,
Annie B

Thursday, November 10, 2011

The Results Are In

Today in lab, we looked at the results from our previous tests. First up we hace the nitrate test. We took our nitrate samples out of the incubator and added 5 drops of dimethyl-a-napthylamine and 5 drops of sulfanilic acid. Since a red color appeared within the broth, this means that our bacteria tested positive for the enzyme nitrate reductase. This enzyme converts nitrate into nitrite. Next up we have the Indole results. We removed the sample from the incubation and added 5 drops of Kovac's Reagent. Since a thin layer of red appeared at the top of our tube this means bacteria 'L' does in fact break down the amino acid Tryptophan (creating Indole in the process). The Urea Hydrolysis tube was removed from the incubator and remained a yellowish color. This means bacteria 'L' tested negitive for the enzyme Urease and does not excrete ammonia. Bacteria 'L' also tested positive in the citrate utilization test! Upon removal from the incubator, it was observed that the slant of the sample turned a beautiful bright blue yet the butt remained a leafy green. This means our bacteria uses citrate as a source of energy by breaking it down with the enzyme Citrate Permease.


Today in lab we also started an Oxidase test. We added N,N,N,N tetramethyl-p-phenylenediamine to our sample in order to see if the bacteria 'L' has the enzyme Cytochrome Oxidase. Our sample turned a purple/pink immediately. This means that 'L' is positive for cytochrome oxidase which is the final electron acceptor in aerobic respiration.


We also observed the effects of the antibiotics that were performed on 'L' last lab. It turns out that 'L' was widely sensitive to Vancomycin, Chloramphenical, Erythromycin and Neomycin. (2,5,6 & 7 on the streak plate).

Oxidase Test (positive)

Results (Left to Right): Citrate, Nitrate, Indole, Urea

Antibiotic Spread Plate

Who Is 'L'? Find Out Next Lab!
Annie B

Tuesday, November 8, 2011

Outbreak & Final 'L' Tests

After an exciting, nerve-wreaking week of watching Outbreak, it is back to the exciting world of bacteria 'L'. First up we took the Citrate test. We used the aseptic technique to place 'L' in a citrate tube, which is a lovely green color. It was then placed in the incubator at 25 degrees Celsius. Next we preped the Indole test. We used the aseptic technique and inoculated our bacteria in the Indole broth and placed the broth in the incubator at 25 degrees Celsius. Next the Nitrate Reduction test was prepared by using the aseptic technique to place bacteria 'L' into the broth and once again into the incubator at 25 degrees Celsius.
The Urea Hydrolysis test was also preped by using the aseptic technique to place bacteria 'L' into the urea broth, this too was incubated at 25 degrees Celsius. These tests will all be checked for results next class.
We than used the aseptic technique to create a new slant of bacteria 'L' so that we could test for the presence of oxidase and using the same technique we created a streak plate of 'L' and placed antibiotics in concentrated areas. This will help us determine what antibiotics are effective against 'L' Moving clockwise we placed the antibiotics in the following order:
1) Penicillin
2) Vancomycin
3) Nocabiocin
4) Tetracycline
5)Erythromycin
6) Chloramphenical
7) Neomycin

1 & 2 affect bacterial cell walls, while 3 attacks Nucleic Acids, and 4, 5, 6 & 7 attack protein synthesis. Therefore each will have a different effect on different bacteria!!


(left to right) Citrate Test, Indole, Nitrate Reduction, Urea

Bacteria 'L' with the antibiotics [1 at top, move clockwise, 7 in center]
Annie B

Thursday, October 27, 2011

Selective & Differential Results

Taking our selective & differential agar plates, we observed the EMB, Mannitol and MacConkey results for bacteria 'L'. The Mannitol plate was negitive, this means our bacteria did not grow and does not tolerate salt and cannot ferment Mannitol. This means our bacteria is not a halophile (therefore not of the staphylococcus genus). Our bacteria did grow on the MacConkey agar & was pinkish colored on the EMB agar! This means our bacteria is labeled as gram-negaticve enteric bacteria and partially ferments lactose.

Mannitol

EMB
Hydrogen Peroxide was also used in class & placed onto of the bacteria to test for the enzyme catalyse. As the hydrogen peroxide touched bacteria 'L' bubbles formed meaning that the bacteria successfully broke down the hydrogen peroxide into water and that it is an aerobe (which we knew since ours is facultative) and does contain the enzyme catalyse!!
Identity of 'L' is almost clear!!
Later,
Annie B

Tuesday, October 25, 2011

Litmus Test Results & Mannitol, EMB, and MacConkey Tests

Our litmus milk broth turned a slightly pinkish but still mostly purple blue. We think it is slightly acidic. And there are curds in the broth. We also preped for several selective and differential tests today, sepecifically the Mannitol, EMB (Eosin Methylene Blue Agar) and MacConkey Tests. Using aseptic technique, we inoculated bacteria 'L' onto these three different Agars. They were then placed in the incubator at 25 degree Celsius. They will be checked next week to determine which of the agars bacteria 'L' thrives on!!

Anne B

Thursday, October 20, 2011

Five Tests & Four Results [ONE TO GO]

It's here! The results from four of the five tests from last lab! [Remember litmus milk test takes a week to get results from].
First up is the Gelatin Hydrolysis Test. After placing the same in the refrigerator for 15 minutes we checked the gelatin tube for liquidation. Then we compared it to the control tube we placed in (of just the gelatin). Result: POSITIVE! Our tube did in fact have liquid!! This means that there is gelatinase in bacteria 'L' because it consumed the gelatin!
Test 2 was the fermentationi of carbohydrates! Upon observation it was determined that our bacteria ferments glucose and sucrose but it does not ferment lactose. Test 3 was TSIA and bacteria 'L' had a red slant and yellow butt of slant. There was also a gas bubble that split the butt! (acidic and produces CO2). This means only glucose was fermented. Last but not least was the results for teh MR-VP! Once we pulled the tube out of the incubator we slit it into two more tubes. In one tube we added 5 drops of Methyl Red de and in the other tube we added 5 drops of VP-B and 15 drops of  VP-A. Our bacteria was negative fore the Methyl Red Test but Positive for the Voges-Proskauer due to a red band identified near the top of the tube. This means it ferments by Butanediol Fermentation and breaks acids down into non-acids!

Gelatin Hydrolysis Liquidation
Lactose

TSIA (notice the air bubble on the right side of butt)

Sucrose

VP-positive (left) MR-negitive (right)
Glucose & Sucrose


Annie B

Tuesday, October 18, 2011

Putting 'L' To The Test (Well actually to many tests...)

After an amazing field trip to the local water filtration plant last Thursday, we are back at 'L' in the laboratory. We addressed five tests: Gelatin Hydrolysis, Fermentation of Carbohydrates, Methyl-Red/Voges-Proskauer (MR-VP), Triple Sugar Iron Agar (TSIA) and a litmus milk test. Today, tuesday, we prepared for all these tests and will check the results next lab! (except the litmus test which takes a week to incubate so that will be checked than!)
First up, we have the Gelatin Hydrolysis Test! To prepare for this test we used the aseptic technique with a inoculating needle to stab our bacteria into a gelatin agar slant. We made sure the bacteria made it into the gelatin agar slant by stabbing the needle 3/4 of the way through the gel! Then the slant was placed into teh incubator at 25 degree Celsius. If the bacteria digests the gelatin, than a liquid should appear in the tube when we check it! If it does indeed digest gelatin, then our bacteria has gelatinase, the enzyme that digests gelatin.

The 2nd test was the fermentation of carbohydrates. This test used a broth tube that contained phenol red-sugar broth & a durham tube (which traps gas bubbles). There were three of these tubes and each contained a different sugar. There was a sucrose, a lactose, and a glucose broth. Using aseotic technique we placed our bacteria into each tube to see which carbohydrates our bacteria can digest. We placed the tubes into the incubator at 25 degrees Celsius.

The next test was the Methyl Red/ Voges-Proskauer (MR-VP) test. We used an MR-VP broth and (using aseptic technique) we put bacteria 'L' into the broth tube. Then the broth was placed in the incubator at 25 degree Celsius. Fourth was the Triple Sugar Iron Agar (TSIA) test. We used the aseptic technique & a inoculating needle to transfer bacteria 'L' 3/4 of the way into a TSIA slant. This too was placed in the incubator at 25 degrees Celsus. The last test was the litmus milk test. Using aseptic technique (again! it never gets old ^_^) bacteria 'L' was placed into a Litmus Milk based broth and then into the incubator at 25 degrees Celsius.


Next class we will see the results!
Annie B

Tuesday, October 11, 2011

GasPak Results & Food Source of Bacteria 'L'

Our bacteria 'L' did infact thrive in the GasPak from last week. This means 'L' can grow in both aerobic & anaerobic conditions. This means our hypothesis from earlier was correct and our bacteria is facultative (it can grow in the presence & absence of oxygen). The Thioglycollate Broth also showed the same result: that 'L' is facultative. 'L' grew throughout the broth: present equally in both the top, red layer (where oxygen is present) and in the bottom yellow layer (where oxygen is not present).
Once we determined the oxygen requirements, we did several tests to figure out what 'L' ate. We took three nutrient agar plates each with a different nutrient. One contained starch, another had casein (a milk protein), and the thrid contained triglycerides (lipids). Using the aseptic technique & a inoculating loop, we spread bacteria 'L' onto all three plates and incubated them at 25 degree Celcius overnight.
We took the three out and examined the results. We had to cover the Starch agar plate with Gram's Iodine for 1 minute to see if the enzyme Amylase was present in our Bacteria. If it was a halo would appear around our bacteria streak. The casein plate was to see if the enzyme Casein Protease was present in our Bacteria. As shown by the halo around the bacteria, Bacteria 'L' does indeed contain Casein Protease! The triglyceride plate was to see if the enzyme Lipase was present in our bacteria. The dark blue color in our sample proves that Bacteria 'L' does eat triglycerides and contains Lipases.
Starch Agar with Gram's Iodine (negitive test)

Casein Agar (positive test)

Triglyceride Agar (positive test)

An upclose look at the halo atop Bacteria 'L'
Peace,
Annie B

Thursday, October 6, 2011

Is 'L' Anaerobic? & Storing Bacteria Forever

Today in lab we discovered how to store bacteria forever! By using Glycerol to slow down the rapid cooling of the bacteria membrnes from the refrigerator (this causes the bacteria membranes to burst). We first used 300 microLiters of Glycerol (100%) using a micropipet. We than placed this into a small storing capsule and replaced the plastic covering on the micropipette to prevent contamination of the bacteria. Than with the new tip we measured 700microLitters of the bacteria in broth and added it to the 100% Glycerol and mixed them together. Once properly labeled we placed the capsule in a -80 degree Celsius refridgertor on the rack that read 'FOR NURSING MAJORS ONLY' so it didn't get confused with Biology majors samples!
We than used Thioglycollate Broth to determine if 'L' was anaerobic or not! This test is positive if the Thioglycollate does not turn red (red is where the chemical reacted with oxygen). Using the aseptic technique, we placed 'L' into the broth and left it in a 25 degree incubator. If the bacteria grows in the yellow portion of the test tube it is anaerobic and if it goes in the red it is aerobic.

Micropipetting The 100% Glycerol

Our bacteria that is going to live FOREVER!

GasPak & Thioglycollate Broth


As a class, we used a GasPak to see if our bacteria was anaerobic. Our sample was placed on a nutrient agar plate (using aseptic technique & inoculating loop) and placed inside the Pak. The Pak eliminates oxygen (as seen on the colorless strip that appears blue when oxygen it present!) Instead CO2 is inside the Pak. If our bacteria 'L' does grow it means that it is anaerobic. Since it has already been thriving in aerobic conditions it really means that it is facultative.

Until Next Lab,
Annie B

Tuesday, October 4, 2011

Acid-fast & Endospore Stains

This week started off with an endospore stain. We first begin a simple stain (smearing, air-drying & heat fixing-mentioned in previous posts!) and than placed the slide in a slide drying rack suspended over a beaker filled with boiling water. After covering the smear with Bibulous paper we wet the paper with Malachite Green dye. We continued to add dye to the paper, keeping it damp for around 5 minutes. We did not let all of the stain evaporate, therefore the slide could properly set but not kill the bacteria! After 5 minutes, we removed the slide with forceps (twisers) and set the slide on paper towels to cool down. The slide was than rinsed with distilled water and remove some excess Malachite Green from the slide. Then we added Safranin dye for 60 to 90 seconds over a sink on a drying rack. Once correct time had passed, we rinsed with distilled water and let dry. Once viewed under a microscope it was apparent that the Green Malachite dye had all rinsed away and only the Safranin stained bacteria remained. This meant that bacteria 'L' did not hace endospores as the Green Malachite dye reminds when there are endospores.

Next we did an acid-fast stain. We started with a simple stain and than suspended it over boiling water on a drying rack. Once covered with Bibulous paper, we saturated it with Ziehl-Neelsen Carbolfuchsin. We continued to keep the slide wet with dye for 3 to 5 minutes. Once time was up, we used forceps to remove the slide to cool down and to throw away the Bibulous paper into the proper waste. The slide was then rinsed with distilled water to remove excess dye and to remove even more stain we took acid-alcohol and dropped it over the slide, which we placed at a 45 degree angle over the sink, until the pink color of the Ziehl-Carbolfuchsin was done running off. After once again using distilled water to rinse, we made sure to cover the smear with Methylene Blue for 2 minutes, rinsed it clean with more distilled water and than blotted dry with Bibulous paper.
Since bacteria 'L' remained dark pink after using acid-alcohol it is determined that our bacteria is acid-fast! This means the dark pink dye was trapped by the waxes in the cell membrane of bacteria 'L'!
Methylene Blue rinsing off!           
Annie B

Thursday, September 29, 2011

Indentifying Bacteria: Capsule Stain Test

Today, we prepared a capsule stain in order to determine if bacteria 'L' has a capsule. First, we created a stain with Nigrosin by placing a drop on a corner of the slide. Then, we dropped a dollop of our bacteria 'L'into the Nigrosin using an inoculating loop and the aseptic technique. After mixing the two together, we took a clean slide and held it at a 45 degree angle and spread the drop across the surface of the slide, creating a thin, even smear. After some air drying, we were reading to begin the capsule stain. Then we used Crystal Violet to cover the smear  for 1 minute and than rinsed the slide (although not for too long as we did not want to rinse away 'L'). The slide than recieved careful blotting with Bibulous paper. It was than viewed under a microscope at 400x with immersion oil (prevents refraction of light as explained in previous posts!).

Bacteria 'L' & my throat sample (environmental) was found not to have a capsule. There was no transparent matter surrounding the bacteria in a 'halo' as our lab manual refers to it.

Myself holding the spread slide (Nigrosin & 'L' mixture)
Until next lab!
Annie B

Tuesday, September 27, 2011

Gram-Staining Bacteria

Today, we took a gram-stain of our bacteria 'L' in order to figure out if it was gram-negitive, gram-positive or gram-variable. Unlike the stain we did before (a simple stain) we used not just Crystal Violet but had to use Iodine (Gram's Iodine to be exact) and Safranin. However before we could use all the fun colorful chemicals above we had to recreate a simple stain. As mentioned previously (earlier blog post) we smeared, air dried and than heat-fixed the bacteria onto a slide. We than stained the bacteria using the Crystal Violet by covering the stain for 20 to 30 seconds over a slide drying rack. Then rinsing the slide with distilled water, we used Gram's Iodine and covered the smear for 1 minute. Then using 95% EtOH we held the size at a 45 degree angle and ran the color off the slide (decolored the sample). After this we rinsed again with distilled water and used Safranin to coverthe slide for 1 minute. Once finished we blotted the slide dry wth Bibulous paper and viewed it under a microscope on 400x using immersion oil. Our bacteria turned out to be Gram-negitive! This is because it did take up the Safranin! The peptidoglycan layer in Gram-Negitive Bacteria is so small that it cannot keep hold of the Crystal Violet once EtOH is applied. We know that because of this thin layer of peptidoglycan, the new color Safranin can hold (which is why the results below show a pink/red bacteria smear! (If it were Gram-Positive it would've been purple!)

 
this was the results under 400x

Rinsing Off The Slide With Distilled Water

The results at a lower magnification (100x)
Hope You Enjoied!
Annie B

Thursday, September 22, 2011

Motility & Colony Classification of 'L' & A Strep Test

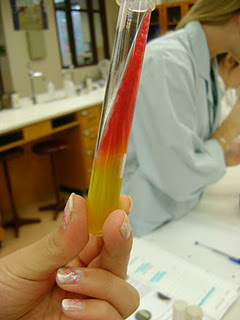
As mentioned in last blog, during the last lab we stabbed the samples into the motility test tube and left it to incubate. After pulling the tube out and holding it up to the light under a magnifying glass, it is noticeable that there is a cloudiness spreading out of the line where we stabbed the bacteria with the inoculating needle. This is a positive test for a motile bacteria! This means that bacteria 'L' is motile! It grew at the entire length of the tube as well. Since there is anaerobic conditions at the bottom of the tube it is probable that our bacteria is able to survive in anareobic and aerobic conditions. However this is not proven, just an inclination; further tests will need to be elvaluated. Most likely since it grew consistantly through the tube we hypothesize that our bacteria is facultative. This means that the bacteria grows by utilizing oxygen but that it can also adapt to grow without the oxygen!

My throat sample (environmental) did not have a halo of cloudiness surrounding the needle stab. Therefore it is non-motile. It has been growing in the incubator therefore we know that it is aerobic. However we could not tell if it grew all the way down the motile test tube. Therefore we hypothesized that it is most likely obligate aerobic bacteria. This means it can only grow in the presence of oxygen.

After testing for motillity, we used our broth samples (from last lab) to make depression slides (so we could observe bacteria 'L' swimming under a microscope!).  To begin, we flicked the broth tubes with our fingers. This swirling of the broth tubes caused a cloudiness to appear and reawaken the bacteria that had settled. We than took a slip cover to cover the depression slide and applied Vasoline to the corners of it. This helps it stick to the slide so the slide does not move (thereby making it easier to observe through a microscope). Using a sterilized, inoculating loop we applied the aseptic techinique to transfer a drop of the bacteria broth to the cover slip. Then flipping the depression slide upside down we stuck it to the cover slip (using the vasoline as the adhesive).  The drop was now suspended over the bacteria!
Using a microscope on 400x (highest power) and using immersion oil, we could observe 'L' swimming! It was so awesome!

As we observed our bacteria, we also noted key aspects that will eventually help us determine the true name of 'L' after several more tests. So far from our class examination we have discovered that 'L' is a rod-shaped (bacillus) bacteria and also exhibits a red color.

Back to the previous lab, we did an experiment to determine if Dr. P had strep. As you can see in the picture, only partical lysing occured. The green residue is a dead giveaway for incomplete lysis. Penicillian did kill the bacteria (meaning he had throat bacteria on the agar medium plate) however since bacitracin did not kill the cells there was no Streptococcus pyogenes on the plate (or therefore in Dr. P's throat!). Since complete lysis did not occur it is safe to say that Dr. P tested negitive for strep!Now it was time to take another look at the T4 bacteriaphage we placed in the incubator last lab. We used the same bacteriophage in two different agar plates (each containing a different bacteria). The agar plate with Dr. P's initials (JAP) the initials were clear all the way to the bottom of the plate, indicating that a complete lysis had occured. The other agar plate had no lysis occur! This proves that bacteriphages only affect specific hosts! This is why certain diseases are transmittible to humans through certain viruses! It is also why animal viruses & bacterias affecting humans was such a huge deal. If it can be transmitted to humans from animals, it is twice as contagious.

Incomplete lysis by antibiotics on blood agar plate

T4 Bacteriophage affecting bacteria


Until next lab!
Annie B

Tuesday, September 20, 2011

Streaking Plates & Creating More Stains

Today in lab we took our environmental sample and our unknown sample and placed the bacterias in test tubes containing broth. We fulfilled this procedure using the aseptic technique. After correctly transferring the bacteria, we labeled the tubes and placed them in the incubator at 25 degrees Celsius for the next class.

Following our lab books instructions for 'Examination of Bacteria and Creating A Pure Culture' we than made a streak plate of our unknown bacteria sample ('L'). This is so we could more closely examine the unknown and to perform more tests on it!

We also did a simple stain of the unknown bacteria 'L' (the slant which we took out of refrigerator) in a Methylene Blue stain. We followed the exact stain procedure as the one in the last blog post. It had to sit on the slide for a good minute before we washed it off with distilled water. We did the exact same Methylene Blue stain on our Environmental sample (in this case my throat swab!).

Staining With Methylene Blue 
Isolating the Bacteria into An Agar Plate


Classmate Preparing To Take A Swab From The Professor's Throat

After we did slides and viewed both the environmental & unknown sample under microscopes. We also made a new isolation of the unknown & environmental sample in peteri dishes (with agar). We also placed both the unknown and the environmental into broth tubes by using the aseptic technique. This ensures no contamination as we sterilize the loop between each transfer. We also started testing the Motility of our environmental & unknown samples. We took an inoculating needle and sterilized it in the flame of a Bunsen burner. Once sterilized, we used the inoculating needle to transfer some bacteria into a semisolid agar (this means there is .4% agar rather than 1.5%) and let it incubate for 24 to 48 hours at 25°C.

A classmate, Monica, then took a swab of our Professor's throat. She used a tongue depressor to make sure his tongue stayed out of the way and simultaneously used a swab over his tonsils.  It was really cool! We than rubbed the swab sample over red blood cells and placed two antibiotics in it: a small dose of Bactratin and a small dose of Penicillin (they were placed only in two concentrated areas on opposite ends of the dish). If the bacteria is only killed by the penicillin it is a normal bacteria that all human's throats contain but if it is also killed by the Bactratin it is Streptococcus pyogenes, which means the professor has strep throat! We currently left it in the incubator to grow!
Than our Professor used a T4 Phage in a peteri dish over a bacteria. He used a micro pipette to drop .5ml in one section of the dish and 1.0ml in another section. He then spelled out his initials: JAP in the center of the dish. (Although it is invisible at this point because the bacteria has not grown yet.) We than placed it in the incubator! Come back in two days to see the results of the T4 & the Professor's throat sample!
Annie B

Thursday, September 15, 2011

A Microscopic look at Simple Stains and Unknown Sample 'L'

After making the simple stain last week, this week we placed the slides under a microscope and took a look at the bacteria! Once placed under the compound light microscope, we set it on the highest power-400x. We also used immersion oil to properly see the bacteria. Immersion oil is important because it keeps the light from refracting so that all the light goes into the view through the diaphragm and the bacteria is clearer. In this case I looked at my throat swab, it was fabulous. The bacteria from my throat is circular (cocci) but it was not in chains so it is not strepo form!! It was really cool to look at and I enjoyed being able to see the shapes of bacteria that we learned about in class live in the lab.

We also took the unknown sample out of the incubator! It had grown into a lovely red culture! We placed it in the fridge for next class :)


Microscope & Immersion oil fun!

Recording what I saw
Until next class,
Anne B

Tuesday, September 13, 2011

Staining Bacteria (Preparing an Unknown Sample & a Smear)

The class took out our streaking plates and observed the individual colony of bacteria that had grown on each one. We compared them to the Master Bacteria sample and some people had to redo them if individual colonies did not grow. Luckily, my sample grew properly so i did not have to re-streak my plate.
We took microscope glass slides (each person did two) and placed a drop of distilled water on them. We then sterilized loops and took a swab of bacteria from our petri dishes and mixed them into the distilled water. After we swirled them onto the glass microscope slides we let them air dry. Once dry we ran them through the flame from a Bunsen Burner to heat-fix the slide (sterilize). We than stained the slides with Crystal Violet and Safranin. The Crystal Violet slide had to sit for 20 to 30 seconds and the Safranin sat for at least 1 minute. Afterwards we rinsed the excess stain off with distilled water and blotted the slide dry with bibulous paper.

We then were given an unknown sample of Bacteria by our professor: Dr. P. We were instructed to identify the unknown sample of bacteria. Our bacteria was labeled 'L.' Before any tests can be done on the bacteria, we first had to create a pure culture of 'L' by using the aseptic technique. First we sterilized the inoculating loop and the top of the test tube that contained 'L' through a flame from a Bunsen Burner. The inoculating loop was then used to carefully obtain a sample of 'L' and spread it along a slant  agar test tube. The loop and test original test tube top were then sanitized once again through the flame and we placed the bacteria in an incubator at 25 degrees Celsius.

The Master Bacteria Sample (left) With The Streak Plate (right)

About to Heat-Fix The Slide

Checking My Slide To See If I Stained It Correctly

The point of keeping the Master Bacteria Sample was so that if the Streaking Petri Dish did not grow individual colonies we could use the Master Sample to redo the Streak Dish. We learned that isolating bacteria on an agar plate surface creates bacterial colonies in a pure culture from a mixture of bacteria. We also  learned how to properly stain bacteria which is important because staining bacteria makes it easier to be seen more clearly through a microscope. We also learned the proper size, shape, and arrangement of bacteria in a fixed smear. My slide displayed circular bacteria that was a slight green tinge in the crystal violet stain.

Until Thursday!,
Annie B