Tuesday, November 22, 2011

Unfrozen Bacteria & Antigens

To start the lab period off, we took out our streak plates made from our frozen samples out of the incubator. Our bacteria (from my throat!) did grow again after it was frozen. This proves that the freezer did preserve the bacteria and not destroy it. The frozen sample is remaining in the freezer in the back, and will preserve for a very long time (my grandchildren could even see it!)


Environmental Bacteria Growth (right half of plate)

Inoculating A Slant


In the next part of lab we performed the ELISA test. This tests for the presence of HIV by using how antigens and antibodies react to one another. In the experiment, the class used the HIV antigen. We added 15 μL (micro liters) of this antigen to each little cup in the tube. We let it sit for 5 minutes, dumped the solution down the sink and than dried out the cups with paper towels. Taking a new pipette cap, we washed the cups with wash buffer. [This procedure occurred twice]. The class then added antibody serums from humans. The first 3 cups received 50 μL of positive (to act as a control), the next 3 cups received 50 μL of negative (again as a control group), and the last four cups were each assigned an unknown. The cups were then dumped & rewashed with the wash buffer and dried. Than 50 μL of the secondary antibody was added to each serum; dumped & rewashed with buffer solution & dried. The class than added 50 μL of sheep enzyme (with a blue indicator) that bonded to the human antibodies. Since the indicator was blue, the serum turned a blue color when the sheep enzymes bonded to the human antibodies (a blue color indicating positive for HIV).

The 3 blue cups on the right indicate HIV

 Since in our test only the positive control turned blue this is a direct indication that none of our unknowns had HIV!
Beef Purity Test
The last part of lab, the class got to check how pure a sample of ground beef was. Taking an agar plate, we suctioned out wells and filled them with different solutions and judged their reactions. We took a sample of raw hamburger meat that was provided for us and tested it with Bovine Albumin, Goat Anti-horse Albumin, Goat Anti-bovine Albumin, & Goat Anti-swine Albumin. If the samples do in fact react to each other than a white solid line will appear. Since the samples must sit for at least 48 hours, join us next lab to see the results!
Annie B

Thursday, November 17, 2011

Lab-Grown Yogurt & Frozen Bacteria

Today in lab, we took out our three milk slash yogurt cups! The control milk spoiled and had a rotten smell. The cups with the pro-biotic tablet & the Kefir did produce yogurts! Yogurt is produced when the bacteria ferments the milk. We tasted them both and the Kefir yogurt was much smoother however both needed some sort of fruit, granola or honey because they were very bland. 
(Left to Right) Pro-Biotic Cup & Kefir Cup

We also took a little adventure to the greenhouse because our professor is always encouraging us to be curious and to ask questions. I loved the greenhouse and am on the hunt for the perfect plant for my dorm.

Our Class in the Greenhouse

A Beautiful Flower

After a trip to the greenhouse, we took our frozen environmental samples (from a few labs ago) out of the freezer (kept at -80 degrees) and created a streak plate out of them. We then placed it in the incubator so see if the bacteria was perserved correctly and as a result would grow.
We also checked on our UV streak plate. Bacteria 'L' did grow. Our professor informed us that it was an error of our own that the UV light did not kill the bacteria. It is due to inadequate exposure to the UV light and we should have left the sample under the light for at least 60 seconds. We also checked the streak plate from the water purifier and determined that the purifier did kill all the bacteria!!! Such a wonderful invention!
Until next lab!
Annie B

Tuesday, November 15, 2011

UV Lights & Yogurt

In lab today we used UV light as a means to kill bacteria and we also cultivated our own pro-biotic yogurt!
To start things off we made a streak of bacteria 'L' and placed it under a UV light. We covered have of the plate as a control to observe if the bacteria was killed or not. We also removed the glass lid so that the UV rays did not refract off the glass. The UV light was left on the bacteria for 30 seconds. After decent exposure, we placed the sample in the incubator. If after 48 hours the bacteria does not grow on the half of the plate that was exposed than we know the UV method worked on bacteria 'L'!

Semi-covered bacteria streaks being exposed to UV light
We also used a Light Purifier in water to kill bacteria and obtain drinkable water. Our professor speaks highly of this purifier because it uses UV light to kill the bacteria in a glass of water. Dr. P uses this often when he is traveling in India and says that since using it he has not gotten sick nor experience traveler's diarrhea. To test this purifier we used the aseptic technique to transfer to of the student's bacterias into the water. While the UV light in the purifier was on, we mixed the water in order to increase maximal contact between the light and bacteria. Once finished we then sterilized the purifier with rubbing alcohol & the flame from a Bunsen burner. We than created a streak plate, incubated it and will return next lab to determine if the purifier worked.

UV light in the Purifier as it elimates bacteria in the water

Making Pro-biotic Yogurt!
We first took Full Fat Vitamin D Milk and heated it up in the microwave until it boiled. Once it came out, we waited until it cooled to 37 degrees Celsius. (Dr. P sped up the process by using cool barrister skills to pour the milk into cups and back into the bowl). We then separated the milk into three cups. The first cup became the control and was only Vitamin D milk. The second milk cup was mixed with a crushed pro-biotic tablet and the third was mixed with Kefir (a pro-biotic drink). The samples were than placed in the incubator and we will check next lab for growth of healthy pro-biotics in the milk. This growth will also lead to the formation of yogurt from the milk!

Vitamin D milk being poured into a bowl to microwave

Crushed Pro-biotic Tablet
Until then,
Annie B

Thursday, November 10, 2011

The Results Are In

Today in lab, we looked at the results from our previous tests. First up we hace the nitrate test. We took our nitrate samples out of the incubator and added 5 drops of dimethyl-a-napthylamine and 5 drops of sulfanilic acid. Since a red color appeared within the broth, this means that our bacteria tested positive for the enzyme nitrate reductase. This enzyme converts nitrate into nitrite. Next up we have the Indole results. We removed the sample from the incubation and added 5 drops of Kovac's Reagent. Since a thin layer of red appeared at the top of our tube this means bacteria 'L' does in fact break down the amino acid Tryptophan (creating Indole in the process). The Urea Hydrolysis tube was removed from the incubator and remained a yellowish color. This means bacteria 'L' tested negitive for the enzyme Urease and does not excrete ammonia. Bacteria 'L' also tested positive in the citrate utilization test! Upon removal from the incubator, it was observed that the slant of the sample turned a beautiful bright blue yet the butt remained a leafy green. This means our bacteria uses citrate as a source of energy by breaking it down with the enzyme Citrate Permease.


Today in lab we also started an Oxidase test. We added N,N,N,N tetramethyl-p-phenylenediamine to our sample in order to see if the bacteria 'L' has the enzyme Cytochrome Oxidase. Our sample turned a purple/pink immediately. This means that 'L' is positive for cytochrome oxidase which is the final electron acceptor in aerobic respiration.


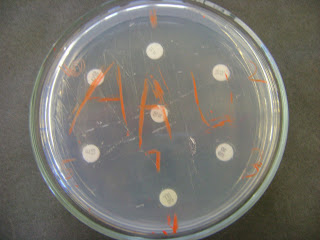
We also observed the effects of the antibiotics that were performed on 'L' last lab. It turns out that 'L' was widely sensitive to Vancomycin, Chloramphenical, Erythromycin and Neomycin. (2,5,6 & 7 on the streak plate).

Oxidase Test (positive)

Results (Left to Right): Citrate, Nitrate, Indole, Urea

Antibiotic Spread Plate

Who Is 'L'? Find Out Next Lab!
Annie B

Tuesday, November 8, 2011

Outbreak & Final 'L' Tests

After an exciting, nerve-wreaking week of watching Outbreak, it is back to the exciting world of bacteria 'L'. First up we took the Citrate test. We used the aseptic technique to place 'L' in a citrate tube, which is a lovely green color. It was then placed in the incubator at 25 degrees Celsius. Next we preped the Indole test. We used the aseptic technique and inoculated our bacteria in the Indole broth and placed the broth in the incubator at 25 degrees Celsius. Next the Nitrate Reduction test was prepared by using the aseptic technique to place bacteria 'L' into the broth and once again into the incubator at 25 degrees Celsius.
The Urea Hydrolysis test was also preped by using the aseptic technique to place bacteria 'L' into the urea broth, this too was incubated at 25 degrees Celsius. These tests will all be checked for results next class.
We than used the aseptic technique to create a new slant of bacteria 'L' so that we could test for the presence of oxidase and using the same technique we created a streak plate of 'L' and placed antibiotics in concentrated areas. This will help us determine what antibiotics are effective against 'L' Moving clockwise we placed the antibiotics in the following order:
1) Penicillin
2) Vancomycin
3) Nocabiocin
4) Tetracycline
5)Erythromycin
6) Chloramphenical
7) Neomycin

1 & 2 affect bacterial cell walls, while 3 attacks Nucleic Acids, and 4, 5, 6 & 7 attack protein synthesis. Therefore each will have a different effect on different bacteria!!


(left to right) Citrate Test, Indole, Nitrate Reduction, Urea

Bacteria 'L' with the antibiotics [1 at top, move clockwise, 7 in center]
Annie B